1. Hardware choices
I love parallel computing, in the early 90s, the only way to play with real multitasking was to buy an expensive SMP motherboard with SMP CPUs. Later, in the 2000s, the multi-cores CPU appeared and replaced smoothly SMP motherboards. At least for my usage. By my dream to build a cluster was still there. Unfortunately, a single node had to be build from a motherboard, a CPU and RAM sticks (with fanless constraint, low power, ...). Then the cluster needs a network switch, and a storage. But it also needs either a HUGE power supply or one power supply per nodes (warming the flat, with a lot of fan and noise) Well it meant at least several thousands euros as I wanted 7 or 15 node to fill the switch and to play with a real cluster. Far too expensive for a toy to play with and I had higher financial priorities. I played with cheaper toys such as Soekris 4501 to practice on embedded linux.
Then, I heard about Raspberry Pi. great : no fan, everything embedded (no motherboard+cpu+ram to buy), very low power (no fan, no heat, no noise), made for Linux ! I immediately thought to my cluster project... 1 switch 16 ports, one 5V 16A power, 16 SD cards... about 500 €, perfect. As I want to try distributed FS such as gluster or GFS, either I need a disk for each node (bad idea as the network interface share the bandwidth with all the USB devices on Raspberry Pi, it would also explode the needed power, it would need a fan for the case and for the power supply), or I need one single disk to share through the network (maybe later). I will test distributed FS on the SD cards, no matter the resulting size.
Then, I want the cluster to be easily transportable, so I need a light power supply, able to power the nodes and the switch if possible, I need to find a compact layout (with 15cm network cables, it WILL be compact).
The nodes
To create a cluster, I need at least nodes connected to a network. Obviously, I want the nodes to be Raspberries. Then, I need a switch to connect them together. The cluster has to be reachable from outside, either from one of the switch port used as an uplink or from one of the nodes with a second network interface (wifi ?). The raspberries have a poor network card sharing its bandwidth with the USB plugs. It can not go faster than 100Mbps. So, I need a switch with N x 10/100Mbps ports and N-1 raspberries. This will drive the overall cost. I wanted to have the whole cluster for less than 1000€, then I chose to buy a 16 port switch and 15 raspberries.
I made an initial order with the core components :- a cheap, small and light 16 10/100 ports switch,
- 15cm RJ45 network cables (x15)
- 1m RJ45 network cable for uplink
- 4GB SD cards (x15)
- Raspberry Pi Rev.B 512 (x15)
- 50cm Cable HDMI/HDMI for debugging
- 2m Cable HDMI/DVI for debugging

I can begin to design the layout to have something very compact. I can stack 8 nodes below the switch and 7 on top of it. The short network cables are perfect for this layout. Furthermore, I will have all the SD cards accessibles from the front panel. As I only have 7 nodes at the top whereas I could have 8, I still have place for an optional 2.5 HardDrive (SSD).
Power supply
Now, I have to find or build a power supply. But I am definitely not an electronic expert and I know my limits... I need to buy it. Each Raspberry needs 5V and at least 400mA when idle with no device connected. It uses more current when it is under heavy load or when overclocked (they will be). But it remains below 700mA as long as they don't have any USB device connected to power (Keyboard, mouse, disk, flashkey, ...). The nodes will never have such devices. So, I need 15x0.7A=10.5A for the nodes. I want to have 3 LEDs on each node's GPIOs, each uses 20mA. I need 15*3*0.02=0.9A more. And I might add an USB hard drive and an USB Wifi dongle to the first node. At the end, I would need a little more than 12A if all nodes are under 100% load, overclocked, with all the LEDs on, with constant writing on the disk and constant wifi transfers... Impossible. So, I chose to order a 5V 12A embeddable power supply. It is more expensive than a standard PC power supply, but it is lighter, smaller and does not need a fan. I need a standard European C13 plug with a master switch to connect the power cord and I want to be able to individually switch on/off each node. All the currents will be kept low, I am not a soldering expert, so, I chose to build the whole cluster using mainly wire-wrapping. 30AWG cable can support 2.6A, perfect. I placed another order for the powering :
- 30AWG cable (100m)
- Wrapping/unwrapping tool
- Power supply 5V 12A
- mini-switchs to mount in front (x15)
- C13 power connector with integrated switch (220V10A)
Fancy Geek lightnings !
I want to have some feedback from the nodes when they are working. I wont have any keyboard, mouse or display connected, but I will use the GPIOs with LEDs. I chose red, green and yellow small 3mm LEDs. They have to fit in the front panel, beside the SD Card slot and the mini switch for each node. The GPIOs can only be source or sink for 3.3V, the Raspberry Pi have a 5V rail and a 3.3V rail available from the pins. I want to be able to disable ALL the LEDs with one switch, to be able to lower the power consumption when needed. So, I choose low tension LEDs, with an associated resistor greater than needed (100 Ohms). I will connect the anodes to the GPIOs and all the cathodes to a LED dedicated common ground cable with a mini switch. The resistors will be placed either on the LEDs cathode or on the LEDs anode, I did not choose yet. As everything will be connected in a very tight place, I need to isolate the connections. I choose to use a heat shrinkable tube, chosen from the resistor's diameter. I placed another order for these fancy things :
- mini switch (same as for the node control)
- Red 3mm 2V 20mA LEDs (x15)
- Green 3mm 2.1V 20mA LEDs (x15)
- Yellow 3mm 2.1V 20mA LEDs (x15)
- 100 Ohms resistors (x45)
- heat shrinkable tube (2.4mm to 1.2mm)
The case
I need to stack 7 or 8 Raspberry Pi together. The stack has to be rigid, robust and easily manageable. I first tried with wood, but it was not a real success.
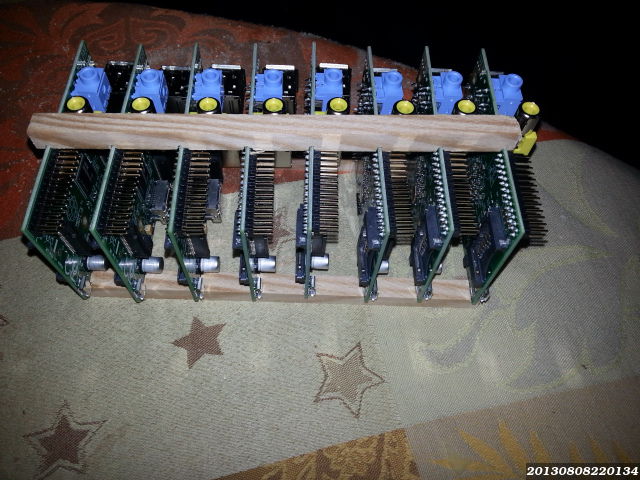
It can help, but is not sufficient. I wanted to use 2mm long tubes through the mounting holes, but I did not find what I needed. I finally chose to use PCB-to-PCB 2cm Standoffs (I felt stupid to not try it first, as it is the most obvious choice). I also need to be able to connect a network cable to the switch easily. Having the 1m cable going out from the box seems unfinished. I chose to use an RJ45 female/female panel adapter to create an RJ45 plug on the back panel.
- PCB-to-PCB 20mm standoffs
- RJ45-RJ45 panel connector
I still need the panels themselves, I thought about steel flat panels, with an internal wood skeleton structure to screw the panels. The wood structure can be made from 9x9mm wood sticks.
The final bill !
| Bought | Used | ||||||||
|---|---|---|---|---|---|---|---|---|---|
| Product | Ref. | Seller | Ref. | Provider | P.U. | Qty | Amount | Qty | Amount |
| Power Supply Unit 5V 12A | 6783773 | RS | 45,57 € | 1 | 45,57 € | 1 | 45,57 € | ||
| Wire to wrap Teflex | 359857 | RS | Tefzel | 0,53 € | 100 | 53,45 € | 1 | 0,53 € | |
| Wrapping tool | 605239 | RS | OK | 49,57 € | 1 | 49,57 € | 0 | 0,00 € | |
| Raspberry Pis | Rev.B512 | Kubii | 30,99 € | 15 | 464,85 € | 15 | 464,85 € | ||
| 4GB SD Cards | S1620289 | LDLC | SD4/4G | Kingston | 6,20 € | 15 | 92,93 € | 15 | 92,93 € |
| RJ45 Cables 15cm | S0610701 | LDLC | 1,50 € | 15 | 22,43 € | 15 | 22,43 € | ||
| 16x10/100 ports Switch | S0830767 | LDLC | TE100-S16EG | TrendNet | 39,90 € | 1 | 39,90 € | 1 | 39,90 € |
| RJ45 Cable 1m (uplink) | S0610435 | LDLC | 2,75 € | 1 | 2,75 € | 1 | 2,75 € | ||
| Micro-switchs | 7064351 | RS | 0,86 € | 16 | 13,76 € | 15 | 12,90 € | ||
| 3mm Red LEDs | 7319382 | RS | 0,21 € | 15 | 3,15 € | 15 | 3,15 € | ||
| 3mm Green LEDs | 7319373 | RS | 0,21 € | 15 | 3,15 € | 15 | 3,15 € | ||
| 3mm Yellow/Green LEDs | 7319364 | RS | 0,18 € | 15 | 2,70 € | 15 | 2,70 € | ||
| 100 Ohms Resistors | 7077587 | RS | 0,02 € | 15 | 0,34 € | 15 | 0,34 € | ||
| 20mm Standoffs | 2808979 | RS | 0,30 € | 100 | 30,38 € | 34 | 10,33 € | ||
| Power C13 connector + switch | 208897 | RS | 13,51 € | 1 | 13,51 € | 1 | 13,51 € | ||
| RJ45/RJ45 F/F panel converter | 1747053 | RS | 10,05 € | 1 | 10,05 € | 1 | 10,05 € | ||
| Heat Shrinkable tube 2.4-1.2mm | 3415893 | RS | 0,01 € | 122 | 1,41 € | 90 | 1,04 € | ||
| Medium Density Fiberboard (MDF) 24x30cm | Bricorama | 0.50 € | 6 | 3.00 € | 6 | 3.00 € | |||
| 0.9x0.9x240cm pine wood | Bricorama | 1.70 € | 2 | 3.40 € | 2 | 3.40 € | |||
| Screws 3mm | 6.55 € | 1 | 6.55 € | 1 | 6.55 € | ||||
Next steps
Now, it is time choose how to use this beast and to make some Software choices.