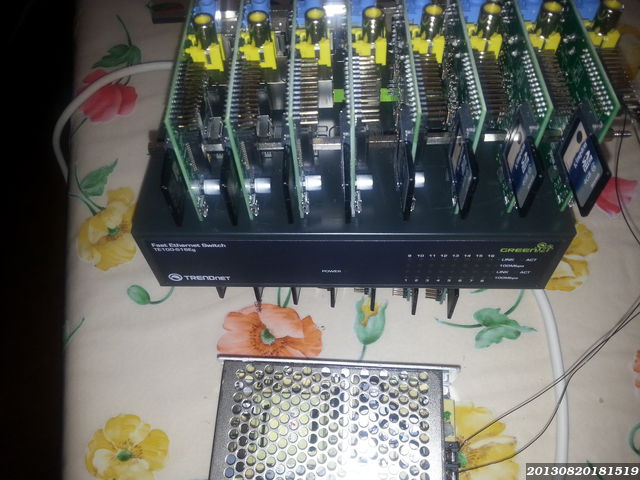
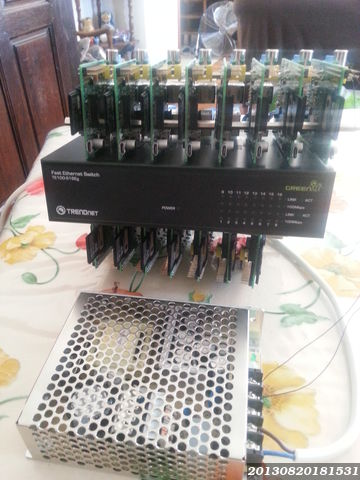
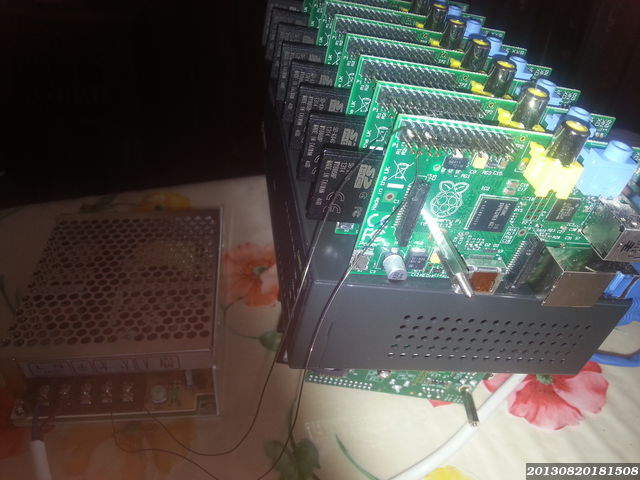
Once I got all the hardware, I had to try to mount everything together. The very first step was to insert all the SD cards in the Raspberry Pi card readers, then to put 7 Raspberry together and 8 Raspberry together to create the 2 raspberry stacks. As I already told in the Hardware choices page, I tried to use wood, but it was not the right solution. I preferred to use PCB-to-PCB standoffs. Of course, it will be a pain if I need to extract the 4th card, but it will be rigid and robust. Then I connected all the network cables to the raspberry. I wanted to have an idea of the final layout. All the cables were OK, the layout seemed fine.
I just had to connect the power supply to test it. It was also the opportunity to make my very first wire-wrapping test. I wrapped 2 cables on the pin P1-02 and P1-06.

I connected the first one to the positive screw on the power supply, the second one to the negative, and I connected quickly the power supply... The power supply green led lighted up, the raspberry red led also (half won at this step, the card myight not boot for any reason), and the other raspberry leds began to blink... I had a preview of the final cluster with only one node.
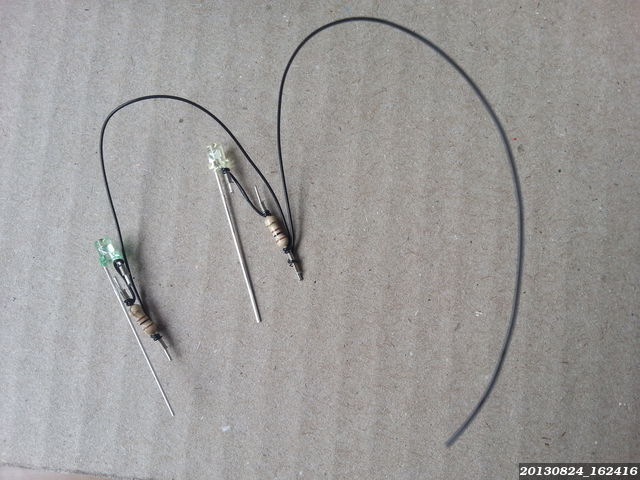
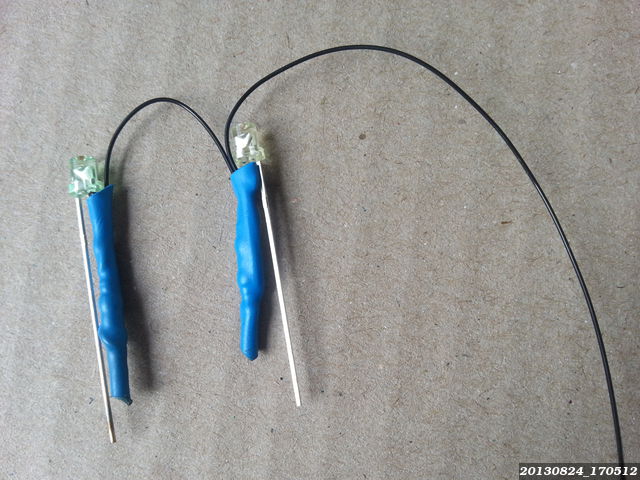
As I wanted to have LEDs connected to the GPIOs and as I wanted to keep the power consumption the lowest possible, I wanted to use the GPIO pins and to be able to disable all the LEDs with a shared switch. I first connected the LEDs with all the anodes connected to the 3.3V (P1-01), and the anodes to the GPIOs 22-23-24 with a 100 Ohms resistor between the cathodes and the GPIOs. It worked, but it was impossible to have one master switch for all the LEDs, my ordered 100 Ohms resistors allow me to use 3.3V only and not 5V from the power supply, I can not use directly a 5V wire with a switch, from the power supply... But I can revert the problem, the GPIOs wont be the negative, but the positive and I will be able to use the negative from the power supply, with a LED switch... Now that I know how to connect, I had to prepare the LEDs to make them more robust and shortcut proof. I chose to wire-wrap the resistors on the cathodes, before the common negative and to secure the connections using an Heat-Shrinkable tube (I ordered other red LEDs and was still waiting for them when I took these pictures) :
The wood was not a good idea to create the nodes stacks, but it can be used as a skeleton for the case. Here is a Blender3D mockup of this skeleton :

I want to have the SD cards available from the front panel. I wanted to have a compact layout, so I bought 15cm network cables. It means that the HDMI connectors wont be available, but that the case will have to be larger because of the composite connectors. I have to place stops at the front and the back of the cards to be able to push/pull the SD cards, but I can not have a stop at the bottom/back because of the network connector. I chose to use directly MDF panels and to screw wood sticks on the panels (I had to buy a Dremel case for this, but I wont count it in the bill ! )
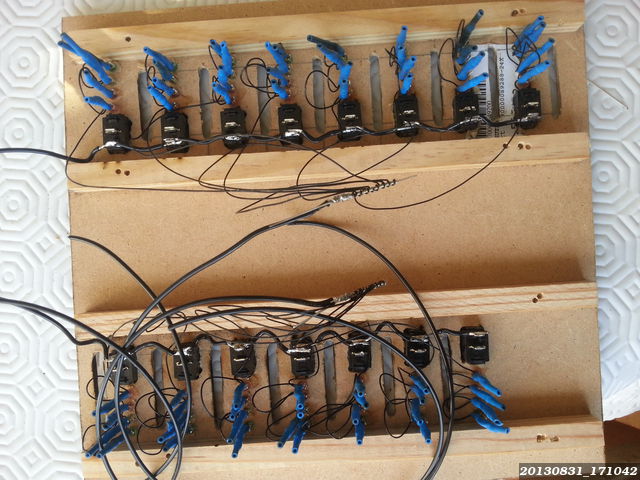
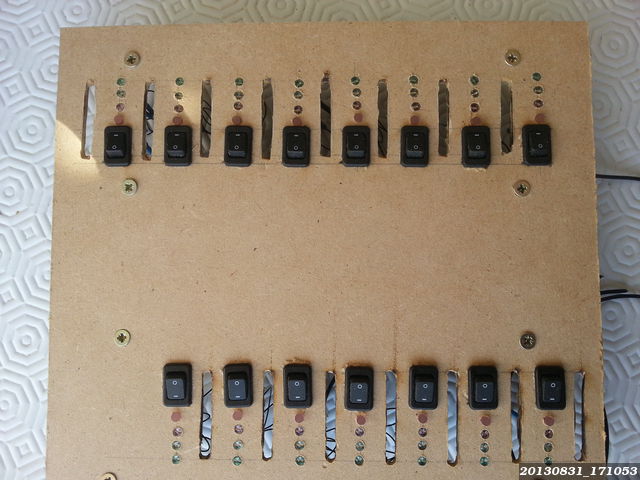
There are two horizontal wood sticks on the front panel to : lock the switch in front of its window and to lock the Raspberry Pis 1cm behind the front panel (to keep enough place for the switch, the LEDs and to have only half of the SD cards outside of the case). Then, I used one stick at the very top and at the very bottom to lock the Raspberry Pi too. Then, I'll make holes in front of each node : SD card slot, 3 LEDs (maybe 4), and the node switch.
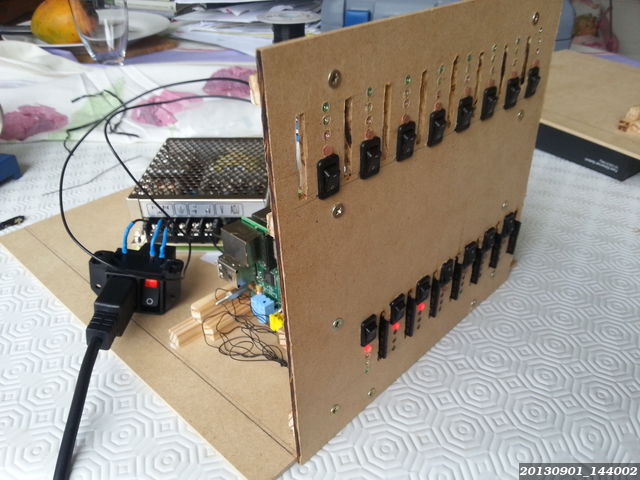
After several tests, I chose to build the case using MDF (Medium Density Fiberboards) and to screw/glue wood sticks inside. It was easier and faster to design the case and to fix design issues. For example, after building the floor, roof and front panels, the cluster began to heat... Adding heat sinks would not have solve the issue. The issue was that the air was not moving inside the case, even with 3 missing panels ! I had to force air flows and to create escapes for the hot air. The hot air was staying inside because of... convection ! What a terrible design issue ! So, I first created escapes for the hot air and waited to see the result. The goal was to keep the 15 CPUs and the switch below 80°C. If needed, I can change the case orientation to make the air flow easier and finally, I can add the biggest possible fan (big mean slower for the same air flow, and slower means more quiet).
I love parallel computing, in the early 90s, the only way to play with real multitasking was to buy an expensive SMP motherboard with SMP CPUs. Later, in the 2000s, the multi-cores CPU appeared and replaced smoothly SMP motherboards. At least for my usage. By my dream to build a cluster was still there. Unfortunately, a single node had to be build from a motherboard, a CPU and RAM sticks (with fanless constraint, low power, ...). Then the cluster needs a network switch, and a storage. But it also needs either a HUGE power supply or one power supply per nodes (warming the flat, with a lot of fan and noise) Well it meant at least several thousands euros as I wanted 7 or 15 node to fill the switch and to play with a real cluster. Far too expensive for a toy to play with and I had higher financial priorities. I played with cheaper toys such as Soekris 4501 to practice on embedded linux.
Then, I heard about Raspberry Pi. great : no fan, everything embedded (no motherboard+cpu+ram to buy), very low power (no fan, no heat, no noise), made for Linux ! I immediately thought to my cluster project... 1 switch 16 ports, one 5V 16A power, 16 SD cards... about 500 €, perfect. As I want to try distributed FS such as gluster or GFS, either I need a disk for each node (bad idea as the network interface share the bandwidth with all the USB devices on Raspberry Pi, it would also explode the needed power, it would need a fan for the case and for the power supply), or I need one single disk to share through the network (maybe later). I will test distributed FS on the SD cards, no matter the resulting size.
Then, I want the cluster to be easily transportable, so I need a light power supply, able to power the nodes and the switch if possible, I need to find a compact layout (with 15cm network cables, it WILL be compact).
To create a cluster, I need at least nodes connected to a network. Obviously, I want the nodes to be Raspberries. Then, I need a switch to connect them together. The cluster has to be reachable from outside, either from one of the switch port used as an uplink or from one of the nodes with a second network interface (wifi ?). The raspberries have a poor network card sharing its bandwidth with the USB plugs. It can not go faster than 100Mbps. So, I need a switch with N x 10/100Mbps ports and N-1 raspberries. This will drive the overall cost. I wanted to have the whole cluster for less than 1000€, then I chose to buy a 16 port switch and 15 raspberries.
I made an initial order with the core components :
I can begin to design the layout to have something very compact. I can stack 8 nodes below the switch and 7 on top of it. The short network cables are perfect for this layout. Furthermore, I will have all the SD cards accessibles from the front panel. As I only have 7 nodes at the top whereas I could have 8, I still have place for an optional 2.5 HardDrive (SSD).
Now, I have to find or build a power supply. But I am definitely not an electronic expert and I know my limits... I need to buy it. Each Raspberry needs 5V and at least 400mA when idle with no device connected. It uses more current when it is under heavy load or when overclocked (they will be). But it remains below 700mA as long as they don't have any USB device connected to power (Keyboard, mouse, disk, flashkey, ...). The nodes will never have such devices. So, I need 15x0.7A=10.5A for the nodes. I want to have 3 LEDs on each node's GPIOs, each uses 20mA. I need 15*3*0.02=0.9A more. And I might add an USB hard drive and an USB Wifi dongle to the first node. At the end, I would need a little more than 12A if all nodes are under 100% load, overclocked, with all the LEDs on, with constant writing on the disk and constant wifi transfers... Impossible. So, I chose to order a 5V 12A embeddable power supply. It is more expensive than a standard PC power supply, but it is lighter, smaller and does not need a fan. I need a standard European C13 plug with a master switch to connect the power cord and I want to be able to individually switch on/off each node. All the currents will be kept low, I am not a soldering expert, so, I chose to build the whole cluster using mainly wire-wrapping. 30AWG cable can support 2.6A, perfect. I placed another order for the powering :
I want to have some feedback from the nodes when they are working. I wont have any keyboard, mouse or display connected, but I will use the GPIOs with LEDs. I chose red, green and yellow small 3mm LEDs. They have to fit in the front panel, beside the SD Card slot and the mini switch for each node. The GPIOs can only be source or sink for 3.3V, the Raspberry Pi have a 5V rail and a 3.3V rail available from the pins. I want to be able to disable ALL the LEDs with one switch, to be able to lower the power consumption when needed. So, I choose low tension LEDs, with an associated resistor greater than needed (100 Ohms). I will connect the anodes to the GPIOs and all the cathodes to a LED dedicated common ground cable with a mini switch. The resistors will be placed either on the LEDs cathode or on the LEDs anode, I did not choose yet. As everything will be connected in a very tight place, I need to isolate the connections. I choose to use a heat shrinkable tube, chosen from the resistor's diameter. I placed another order for these fancy things :
I need to stack 7 or 8 Raspberry Pi together. The stack has to be rigid, robust and easily manageable. I first tried with wood, but it was not a real success.
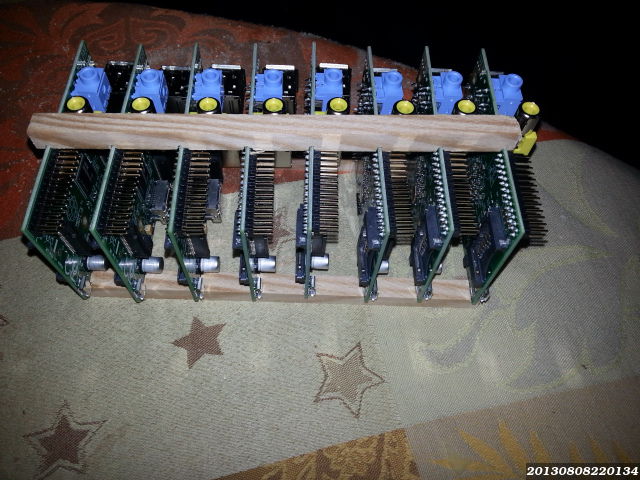
It can help, but is not sufficient. I wanted to use 2mm long tubes through the mounting holes, but I did not find what I needed. I finally chose to use PCB-to-PCB 2cm Standoffs (I felt stupid to not try it first, as it is the most obvious choice). I also need to be able to connect a network cable to the switch easily. Having the 1m cable going out from the box seems unfinished. I chose to use an RJ45 female/female panel adapter to create an RJ45 plug on the back panel.
I still need the panels themselves, I thought about steel flat panels, with an internal wood skeleton structure to screw the panels. The wood structure can be made from 9x9mm wood sticks.
| Bought | Used | ||||||||
|---|---|---|---|---|---|---|---|---|---|
| Product | Ref. | Seller | Ref. | Provider | P.U. | Qty | Amount | Qty | Amount |
| Power Supply Unit 5V 12A | 6783773 | RS | 45,57 € | 1 | 45,57 € | 1 | 45,57 € | ||
| Wire to wrap Teflex | 359857 | RS | Tefzel | 0,53 € | 100 | 53,45 € | 1 | 0,53 € | |
| Wrapping tool | 605239 | RS | OK | 49,57 € | 1 | 49,57 € | 0 | 0,00 € | |
| Raspberry Pis | Rev.B512 | Kubii | 30,99 € | 15 | 464,85 € | 15 | 464,85 € | ||
| 4GB SD Cards | S1620289 | LDLC | SD4/4G | Kingston | 6,20 € | 15 | 92,93 € | 15 | 92,93 € |
| RJ45 Cables 15cm | S0610701 | LDLC | 1,50 € | 15 | 22,43 € | 15 | 22,43 € | ||
| 16x10/100 ports Switch | S0830767 | LDLC | TE100-S16EG | TrendNet | 39,90 € | 1 | 39,90 € | 1 | 39,90 € |
| RJ45 Cable 1m (uplink) | S0610435 | LDLC | 2,75 € | 1 | 2,75 € | 1 | 2,75 € | ||
| Micro-switchs | 7064351 | RS | 0,86 € | 16 | 13,76 € | 15 | 12,90 € | ||
| 3mm Red LEDs | 7319382 | RS | 0,21 € | 15 | 3,15 € | 15 | 3,15 € | ||
| 3mm Green LEDs | 7319373 | RS | 0,21 € | 15 | 3,15 € | 15 | 3,15 € | ||
| 3mm Yellow/Green LEDs | 7319364 | RS | 0,18 € | 15 | 2,70 € | 15 | 2,70 € | ||
| 100 Ohms Resistors | 7077587 | RS | 0,02 € | 15 | 0,34 € | 15 | 0,34 € | ||
| 20mm Standoffs | 2808979 | RS | 0,30 € | 100 | 30,38 € | 34 | 10,33 € | ||
| Power C13 connector + switch | 208897 | RS | 13,51 € | 1 | 13,51 € | 1 | 13,51 € | ||
| RJ45/RJ45 F/F panel converter | 1747053 | RS | 10,05 € | 1 | 10,05 € | 1 | 10,05 € | ||
| Heat Shrinkable tube 2.4-1.2mm | 3415893 | RS | 0,01 € | 122 | 1,41 € | 90 | 1,04 € | ||
| Medium Density Fiberboard (MDF) 24x30cm | Bricorama | 0.50 € | 6 | 3.00 € | 6 | 3.00 € | |||
| 0.9x0.9x240cm pine wood | Bricorama | 1.70 € | 2 | 3.40 € | 2 | 3.40 € | |||
| Screws 3mm | 6.55 € | 1 | 6.55 € | 1 | 6.55 € | ||||
Now, it is time choose how to use this beast and to make some Software choices.
Well, my goal was to build a cluster to use it as a lab. I did not really care about the power of the cluster or about the storage. VM are good, but not geek enough, not fun enough and boring. The very first step was to make some Hardware choices and to make the Hardware assembly. Once all the hardware piece are together, I had to make some Software choices and to automate their installation. I was unable to automate the hardware assembly for the 15 nodes, but I can automate the software deployment !
Hardware choices
Hardware assembly
Software choices
Master Node Installation
The nodes will be headless, this configuration enables to :
- Install software and data on every node, and to reset all of them to a clean state in 2 commands
- Install, Upgrade or change the root filesystem (clean installation) of every node in 2 commands
- Install, Upgrade or change the boot filesystem (firmware) of every nodes in 2 commands
On my Linux workstation, I download the last Raspbian Unattended Installer from [[https://github.com/debian-pi/raspbian-ua-netinst/releases/latest]] and write it to the future master's SD card :
wget -c https://github.com/debian-pi/raspbian-ua-netinst/releases/download/v1.1.7/raspbian-ua-netinst-v1.1.7.img.xz -O /tmp/raspbian-ua-netinst.xz
xzcat /tmp/raspbian-ua-netinst.xz | sudo dd of=/dev/sdi
Create an unattended configuration file to customize a little bit the installation. I replaced the default "pi" hostname by "raspbian10-base", I created a default user "pi" with password "pi". The default installation does not have any regular user, only "root", and the default openSSH does not allow access to root. Quite embarrassing for an unattended installation without a local keyboard, mouse and display... Given that I need to install software as a regular user, I'll need to create him later, so I created him at installation, without any privileges. I also customized the boot parameters to have a better fsck (this will be an headless appliance).
sudo mount /dev/sdi1 /mnt
cat << EOF | sudo tee /mnt/installer-config.txt
hostname=raspbian10-base
username=pi
userpw=pi
cmdline="dwc_otg.lpm_enable=0 console=tty1 elevator=deadline fsck.repair=yes"
EOF
sudo umount /mnt
I place the SD card in the master's SD slot, connect it to the network (to internet), the power and wait for the process to complete (20-30 minutes). At the end, I have a Raspbian installed, with the latest kernel and packages. Its hostname is pi, the root password is raspbian. It is connected to my network with a dynamic DHCP address and has an SSH server listening allowing root connections. As I love to copy/paste command lines (from this page), I need to have both this page and a terminal on the RPi from my workstation. I need the RPi IP address, so I prepared my internal network's DHCP to give a fixed address to this RPi, I already know its IP. If I did not, I would have to connect a display to the HDMI connector and a keyboard to connect as root and ask for the IP address. Anyway, now, I can connect to the RPi from my workstation, with SSH, as root and I can do the installation with copy/paste the command from this page... I'm so lazy...
First, I check that the system is up to date regarding the repositories, the package lists and the installed packages :
apt-get install -y aptitude &&
aptitude update &&
aptitude safe-upgrade -y &&
aptitude dist-upgrade -y &&
aptitude full-upgrade -y &&
aptitude purge ~c -y &&
aptitude clean
I connect an external white LED on each RPi card's GPIO4, through a resistor, to expose the activity (ACT) kernel LED. Thus, I need to tell the firmware to use the GPIO4 as Activity LED exposed to the kernel. Then, I can change the behavior (triggering) of this LED in the OS' userspace (`echo heartbeat > /sys/class/leds/led0/trigger` or `echo heartbeat > /sys/class/leds/ACT/trigger`, depending on the kernel version), but it occurs late in the boot process. I prefer to have heartbeat very early, initialized by the firmware.
echo 'dtparam=act_led_gpio=4' >> /boot/firmware/config.txt
echo 'dtparam=act_led_trigger=heartbeat' >> /boot/firmware/config.txt
Then, I generate the root's SSH passwordless key pair and I allow key-authentication for root to root. I also relax the checkings regarding the Host Keys (to avoid the question asking to add or not the remote host key during the first connection) and the DNS (to avoid DNS checkings that could slower the connections). As I generate it before making the snapshot that will be used as a template for the node's filesystem, it means that all the nodes will have the same root's key pair and will all be able to ssh to the others passwordless.
ssh-keygen -N "" -f /root/.ssh/id_rsa
cat /root/.ssh/id_rsa.pub > /root/.ssh/authorized_keys
echo >> /etc/ssh/ssh_config
echo "    StrictHostKeyChecking no" >> /etc/ssh/ssh_config
echo "UseDNS no" >> /etc/ssh/sshd_config
I want to be able to connect directly as root from my laptops, so I also add my public keys to root's authorized_keys file (useful when opening a terminal to every node with cssh) :
echo "ssh-rsa AAAAB3NzaC1yc2EAAAABIwAAAIEAtM8LzekUr46wvVNWoYzxPuKVTv7yFp+Aa/a1vKAendFa3xsMZz6Pp0Xn8U5ZYbTpqqVeM8O+ETqjtpBVk+7+C516DwB+R/cKulTjy061fBPZvTp5pIKm4+NQXNBhwjmQs//nWJ54PlDS5mHuj9NalX07b2OBztrvLjPzf/m4sB0= Francois Cerbelle" >> /root/.ssh/authorized_keys
echo -n '192.168.2.1 ' > /root/.ssh/known_hosts
cat /etc/ssh/ssh_host_ecdsa_key.pub >> /root/.ssh/known_hosts
echo -n ' root@(none)' >> /root/.ssh/known_hosts
I need a storage to store the cluster files. I use a small hard drive, with one big partition, formatted in ext4 and connected to the USB port.
echo /dev/sda1 /data auto defaults 0 1 >> /etc/fstab
mkdir /data
mount -a
apt-get -y update &&
apt-get -y upgrade &&
apt-get -y dist-upgrade &&
apt-get -y install puppetserver &&
apt-get -y autoremove &&
apt-get -y clean &&
apt-get -y autoclean

cat << EOF | augtool
set /files/etc/puppet/puppet.conf/main/server rpinode01.raspicluster.cerbelle.net
set /files/etc/puppet/puppet.conf/main/pluginsync true
set /files/etc/puppet/puppet.conf/main/report true
set /files/etc/puppet/puppet.conf/main/report_server rpinode01.raspicluster.cerbelle.net
set /files/etc/puppet/puppet.conf/main/certname "rpinode01.raspicluster.cerbelle.net"
set /files/etc/puppet/puppet.conf/user/waitforcert 120
set /files/etc/default/puppet/START no
set /files/etc/hosts/01/ipaddr 192.168.2.1
set /files/etc/hosts/01/canonical rpinode01.raspicluster.cerbelle.net
set /files/etc/hosts/01/alias[1] rpinode01
save
EOF
First, I overclock the RPi, using the maximum allowed without breaking the warranty. Other values might set the "void warranty bit" in the card. These are sufficient (1GHz) and should not bring the RPi to its max temperature (85°C), even in a compact case. If it should happen, the RPi has an internal security which will slow it down until the temperature fall. NEVER change the max temperature threshold, it would break the warranty.
echo '#arm_freq=1000' >> /boot/config.txt
echo '#core_freq=500' >> /boot/config.txt
echo '#sdram_freq=600' >> /boot/config.txt
echo '#over_voltage=6' >> /boot/config.txt
echo 'gpu_mem=16' >> /boot/config.txt
I also install a library which is configured to be automatically preloaded (LD_PRELOAD) by the dynamic linker with every binary and which overloads the memcpy and memmove functions to optimize them on the RPi.
apt-get install -y raspi-copies-and-fills
I choose to compile the en_US.UTF8 and to use it as default locale. But I choose to locate the RPi in the Europe/Paris timezone.
#dpkg-reconfigure locales
sed -i 's/.*en_US.UTF-8/en_US.UTF-8/' /etc/locale.gen
echo en_US.UTF-8 > /etc/default/locale
locale-gen
dpkg-reconfigure tzdata
I had to install the linux kernel 3.12, the last Raspbian precompiled version including aufs.
apt-get install -y linux-image-3.12-1-rpi
cp /boot/initrd.img-3.12-1-rpi /boot/initrd.img
cp /boot/vmlinuz-3.12-1-rpi /boot/kernel.img
sed -i 's/^initramfs.*/initramfs initrd.img/' /boot/config.txt
sed -i 's/^kernel=.*/kernel=kernel.img/' /boot/config.txt
reboot
apt-get purge -y linux-image-3.18.0-trunk-rpi
Before taking the snapshot, Iclean the downloaded packages stored in apt cache, it is useless to replicate them on the slaves, they will be obsoletes and it will use bandwith/time to transfer them through the cluster network.
aptitude clean
Then, I create the root and boot filesystems copy as templates for the slaves.
rm -Rf /data/slaves/{rootfs,bootfs}
mkdir -p /data/slaves/{rootfs,bootfs}
cp -ax / /data/slaves/rootfs/
cp /boot/*.{bin,dat,elf} /data/slaves/bootfs/
And I remove the files that were automatically created during the previous steps and which are irrelevant to the slave nodes. The slave's root account does not need my installation bash history and, more important, they will have a different ethernet (MAC) address, so I make the system forget the MAC mapping to the NIC number (eth0, eth1, ...) :
rm /data/slaves/rootfs/root/.bash_history
rm /data/slaves/rootfs/etc/udev/rules.d/70-persistent-net.rules
The slaves will not have any hard drive connected so I have to remove the related line in /etc/fstab and they will not need the / and /boot mount neither because they will be mounted during the initrd, so I disable (comment) all these lines from the file :
sed -i 's~^/.* / .*$~#&~' /data/slaves/rootfs/etc/fstab
sed -i 's~^/.* /boot .*$~#&~' /data/slaves/rootfs/etc/fstab
sed -i 's~^/.* /data .*$~#&~' /data/slaves/rootfs/etc/fstab
rmdir /data/slaves/rootfs/data
I cleanup the /etc/hosts file, no need for 127.0.1.1 to resolve its own name as each node will have a DHCP assigned IP address with a DNS server resolving this external IP to the right name. Furthermore, I add a custom script to update the files and the running system with the right hostname as soon as the DHCP assign an IP address to the node. Basically, the node will have no name when it boots, as there is none in the configuration files, but everything will be automatically updated in files and in memory from the DHCP answer.
cat > /data/slaves/rootfs/etc/hosts << EOF
127.0.0.1       localhost
EOF
cat > /data/slaves/rootfs/etc/dhcp/dhclient-exit-hooks.d/hostname << EOF
#!/bin/bash

if [ \$reason = "BOUND" ]; then
    oldhostname=\$(hostname -s)
    if [ \$oldhostname != \$new_host_name ]; then
        echo \$new_host_name > /etc/hostname
        hostname -F /etc/hostname
    fi
fi
EOF
All the remaining configuration (common to each node, specific to master and specific to slaves) will be handled and managed by puppet. So, I need to install a first standalone puppet master. It will use the embedded WebRicks to serve the incoming connections. Even if WebRicks is mono-threaded, it is not an issue as it will have to serve the master's puppet agent first with a "master configuration". This master configuration will begin to manage the master's puppet master installation and will configure it with Apache and Passenger (mod_rails). So, this very first puppet master installation is only intended to be used only once.
apt-get install -y puppetmaster
/etc/init.d/puppetmaster stop
cat << EOF | augtool
set /files/etc/default/puppetmaster/START yes
set /files/etc/puppet/puppet.conf/master/autosign true
set /files/etc/puppet/puppet.conf/master/allow_duplicate_certs true

# Puppet 3.x
#set /files/etc/puppet/puppet.conf/main/modulepath /etc/puppet/modules:/etc/puppet/site-modules:/usr/share/puppet/modules
set /files/etc/puppet/puppet.conf/main/environmentpath /etc/puppet/environments
set /files/etc/puppet/puppet.conf/main/basemodulepath /etc/puppet/modules:/etc/puppet/environments/production/site-modules:/usr/share/puppet/modules
save
EOF
mkdir -p /etc/puppet/environments/production/manifests
apt-get install -y mercurial
hg clone --insecure https://www.cerbelle.net/hg/puppet-modules /tmp/puppet-modules
/etc/init.d/puppetmaster stop
mv /tmp/puppet-modules /tmp/puppet
mkdir -p /etc/puppet/environments/production/manifests
cp -r /tmp/puppet/modules /etc/puppet/environments/production
cp /tmp/puppet/manifests/default.pp /etc/puppet/environments/production/manifests/site.pp
cp -r /tmp/puppet/hieradata /etc/puppet/
cp /tmp/puppet/hiera.yaml /etc/puppet/
ln -s /etc/puppet/hiera.yaml /etc/
rm -Rf /tmp/puppet
/etc/init.d/puppetmaster start
sed -i 's/.*dhcp.*/#&/' /etc/network/interfaces
cat >> /etc/network/interfaces << EOF
iface eth0 inet static
    address 192.168.2.1
    network 192.168.2.0
    netmask 255.255.255.0
    gateway 192.168.2.254
    broadcast 192.168.2.255
EOF
echo 'rpinode01' > /etc/hostname
hostname -F /etc/hostname
cat > /etc/hosts << EOF
127.0.0.1       localhost
192.168.2.1 rpinode01.raspicluster.cerbelle.net rpinode01
192.168.2.2 rpinode02.raspicluster.cerbelle.net rpinode02
192.168.2.3 rpinode03.raspicluster.cerbelle.net rpinode03
192.168.2.4 rpinode04.raspicluster.cerbelle.net rpinode04
192.168.2.5 rpinode05.raspicluster.cerbelle.net rpinode05
192.168.2.6 rpinode06.raspicluster.cerbelle.net rpinode06
192.168.2.7 rpinode07.raspicluster.cerbelle.net rpinode07
192.168.2.8 rpinode08.raspicluster.cerbelle.net rpinode08
192.168.2.9 rpinode09.raspicluster.cerbelle.net rpinode09
192.168.2.10 rpinode10.raspicluster.cerbelle.net rpinode10
192.168.2.11 rpinode11.raspicluster.cerbelle.net rpinode11
192.168.2.12 rpinode12.raspicluster.cerbelle.net rpinode12
192.168.2.13 rpinode13.raspicluster.cerbelle.net rpinode13
192.168.2.14 rpinode14.raspicluster.cerbelle.net rpinode14
192.168.2.15 rpinode15.raspicluster.cerbelle.net rpinode15
EOF
cat > /etc/resolv.conf << EOF
domain raspicluster.cerbelle.net
search raspicluster.cerbelle.net
nameserver 192.168.2.254
EOF
apt-get install -y dnsmasq
/etc/init.d/dnsmasq stop
echo 'conf-dir=/etc/dnsmasq.d' >> /etc/dnsmasq.conf
cat > /etc/dnsmasq.d/rpicluster << EOF
dhcp-range=192.168.2.20,192.168.2.250,12h
dhcp-host=b8:27:eb:cb:63:18,,rpinode01,192.168.2.1,1h
dhcp-host=b8:27:eb:c2:9f:19,,rpinode02,192.168.2.2,1h
dhcp-host=b8:27:eb:27:b6:53,,rpinode03,192.168.2.3,1h
dhcp-host=b8:27:eb:b9:61:6d,,rpinode04,192.168.2.4,1h
dhcp-host=b8:27:eb:b6:57:a0,,rpinode05,192.168.2.5,1h
dhcp-host=b8:27:eb:ef:75:38,,rpinode06,192.168.2.6,1h
dhcp-host=b8:27:eb:2b:41:91,,rpinode07,192.168.2.7,1h
dhcp-host=b8:27:eb:0c:25:82,,rpinode08,192.168.2.8,1h
dhcp-host=b8:27:eb:e5:83:f5,,rpinode09,192.168.2.9,1h
dhcp-host=b8:27:eb:c5:5e:e0,,rpinode10,192.168.2.10,1h
dhcp-host=b8:27:eb:f2:55:fb,,rpinode11,192.168.2.11,1h
dhcp-host=b8:27:eb:0c:dc:64,,rpinode12,192.168.2.12,1h
dhcp-host=b8:27:eb:22:97:40,,rpinode13,192.168.2.13,1h
dhcp-host=b8:27:eb:e3:00:59,,rpinode14,192.168.2.14,1h
dhcp-host=b8:27:eb:19:dc:95,,rpinode15,192.168.2.15,1h
dhcp-option=6,192.168.2.1,192.168.2.254 # dns-server
dhcp-option=3,192.168.2.254 # router
dhcp-option=15,raspicluster.cerbelle.net # domain-name
dhcp-option=66,192.168.2.1 # tftp-server
dhcp-option=69,192.168.2.1 # smtp-server
dhcp-option=119,raspicluster.cerbelle.net # domain-search
enable-tftp
tftp-root=/data/slaves/tftp
EOF
mkdir -p /data/slaves/tftp
chmod -R u+rw,g+r,o+r /data/slaves/tftp
echo "xmail xmail/daemonpasswd string postmaster" | debconf-set-selections
echo "xmail xmail/daemonuser string postmaster" | debconf-set-selections
echo "xmail xmail/domainname string /etc/mailname" | debconf-set-selections
apt-get install -y xmail
Installing a single node from the internet server is fine, the other nodes will not download everything, they will use a copy of the master filesystem as a template but they will install the additional specific packages by themselves. Installing on one single node is fine too, but installing (even a single package without dependencies) from 15 of them is slow and unfair !
apt-get install -y apt-mirror
mv /var/spool/apt-mirror /data/
sed -i 's~set base_path.*~&\nset base_path    /data/apt-mirror~' /etc/apt/mirror.list
sed -i 's~set run_postmirror.*~&\nset run_postmirror 1~' /etc/apt/mirror.list
sed -i 's~^deb~#&~' /etc/apt/mirror.list
sed -i 's~^clean~#&~' /etc/apt/mirror.list
cat >> /etc/apt/mirror.list << EOF

deb-armel http://archive.raspberrypi.org/debian wheezy main untested
deb-armhf http://archive.raspberrypi.org/debian wheezy main untested

deb-armhf http://archive.raspbian.org/mate wheezy main
deb-src http://archive.raspbian.org/mate wheezy main

deb-armhf http://archive.raspbian.org/multiarchcross wheezy main
deb-src http://archive.raspbian.org/multiarchcross wheezy main

deb-armhf http://archive.raspbian.org/raspbian wheezy main contrib non-free rpi firmware
deb-src http://archive.raspbian.org/raspbian wheezy main contrib non-free rpi firmware
deb-armhf http://archive.raspbian.org/raspbian wheezy-staging main contrib non-free rpi firmware
deb-src http://archive.raspbian.org/raspbian wheezy-staging main contrib non-free rpi firmware

deb-armhf http://archive.raspbian.org/raspbian jessie main contrib non-free rpi firmware
deb-src http://archive.raspbian.org/raspbian jessie main contrib non-free rpi firmware
deb-armhf http://archive.raspbian.org/raspbian jessie-staging main contrib non-free rpi firmware
deb-src http://archive.raspbian.org/raspbian jessie-staging main contrib non-free rpi firmware

clean http://archive.raspberrypi.org/debian
clean http://archive.raspbian.org/raspbian
EOF

cat > /data/apt-mirror/var/postmirror.sh << EOF
#!/bin/sh
/data/apt-mirror/var/clean.sh
chmod -R 755 /data/apt-mirror/mirror
chown -R apt-mirror.apt-mirror /data/apt-mirror/
find /data/apt-mirror/mirror -type f -exec chmod 644 {} \;

EOF
I enable the automatic execution every night :
sed -i 's~^#0~0~' /etc/cron.d/apt-mirror
sed -i 's~/var/spool~/data~' /etc/cron.d/apt-mirror
apt-mirror has a bug in a search : first for "arm" and then for "armhf", the second is never found as the first also match... Here is my fix :
sed -i 's~arm|armhf~armhf|arm~' /usr/bin/apt-mirror
I launch an immediate mirror update :
This step which can take several days to download the 175GB, so I plug directly the hard-drive to one of my other local servers to initialize the cluster mirror with an already existing raspbian mirror. And I can continue with the other chapters while this mirroring is running. As this chapter takes a very long time to be executed, first it was designed to be non blocking, so I can continue with the following chapters while updating the mirror.
At the end of the mirroring process, I update the master's sources.list file to use my local repository from the filesystem (if I choose to not install Apache in the next steps or if Apache crashes)
su - apt-mirror -c apt-mirror
echo 'deb file:///data/apt-mirror/mirror/archive.raspbian.org/raspbian wheezy main firmware' > /etc/apt/sources.list
echo 'deb file:///data/apt-mirror/mirror/archive.raspberrypi.org/debian wheezy main' >> /etc/apt/sources.list
apt-get update
Given the cluster design, the slaves will execute Puppet agent and the PuppetMaster will be on the master node. Rake, the default PuppetMaster HTTP server is mono-thread and will not be able to answer to 15 simultaneous inquiries. It will need a stronger HTTP server such as Apache associated with mod_passenger. As I will need Apache for PuppetMaster, I will also use Apache to serve the repository mirrors. I install Apache and configure it to serve the files located in /data/apt-mirror/mirror.
apt-get install -y apache2
cat > /etc/apache2/conf.d/mirror << EOF
    <Directory /data/apt-mirror/mirror/>
        Options Indexes FollowSymLinks MultiViews
        AllowOverride None
        Order allow,deny
        allow from all
    </Directory>
    Alias /mirror /data/apt-mirror/mirror
EOF
/etc/init.d/apache2 restart
TODO: Optimize the Apache configuration to use less memory and CPU by decreasing the number of processes and of threads configured in /etc/apache2/apache2.conf
Use the shared mirrored repository, then update the package list :
echo 'deb http://192.168.2.1/mirror/archive.raspbian.org/raspbian wheezy main firmware' > /data/slaves/rootfs/etc/apt/sources.list
echo 'deb http://192.168.2.1/mirror/archive.raspberrypi.org/debian wheezy main' >> /data/slaves/rootfs/etc/apt/sources.list
chroot /data/slaves/rootfs/ /usr/bin/apt-get update
I enable the frame buffer in the command line (bcm2708_fb.fbwidth=1280 bcm2708_fb.fbheight=800 bcm2708_fb.fbdepth=8) because I sometimes debug a failing node by connecting it to a video projector.
apt-get install -y build-essential python bc git
git clone git://git.denx.de/u-boot.git
cd u-boot/
Apply the following patch to make the boot faster
cat | patch -p1 << EOF
--- u-boot.orig/include/configs/rpi-common.h    2016-01-22 10:25:00.487730581 +0100
+++ u-boot/include/configs/rpi-common.h    2016-01-22 10:31:02.286654115 +0100
@@ -168,7 +168,8 @@
     "scriptaddr=0x02000000\0" \\
     "ramdisk_addr_r=0x02100000\0" \\

-#define BOOT_TARGET_DEVICES(func) \\
+#define BOOT_TARGET_DEVICES(func) func(DHCP, dhcp, na)
+#define DISABLED_BOOT_TARGET_DEVICES(func) \\
     func(MMC, mmc, 0) \\
     func(USB, usb, 0) \\
     func(PXE, pxe, na) \\
EOF
make rpi_defconfig
make
cp u-boot.bin /data/slaves/bootfs/
grep -v initramfs /boot/config.txt > /data/slaves/bootfs/config.txt
echo 'kernel=u-boot.bin' >> /data/slaves/bootfs/config.txt
cat > /data/slaves/tftp/boot.scr << EOF
tftp \${kernel_addr_r} vmlinuz-3.12-1-rpi
tftp \${ramdisk_addr_r} initramfs.igz.uimg
setenv bootargs "bcm2708_fb.fbwidth=1280 bcm2708_fb.fbheight=800 bcm2708_fb.fbdepth=8 dwc_otg.lpm_enable=0 console=ttyAMA0,115200 kgdboc=ttyAMA0,115200 console=tty1 elevator=deadline root=/dev/mmcblk0p2 rootwait quiet smsc95xx.macaddr=\${usbethaddr} aufs=disk masterip=192.168.2.1"
bootz \${kernel_addr_r} \${ramdisk_addr_r}
EOF
/root/u-boot/tools/mkimage -A arm -O linux -T script -C none -n "U-Boot script" -d /data/slaves/tftp/boot.scr /data/slaves/tftp/boot.scr.uimg
No uEnv.txt (on local boot partition)
TODO: remove compilation dependencies packages
cp /boot/vmlinuz-3.12-1-rpi /data/slaves/tftp/
Ref : [[http://jootamam.net/howto-initramfs-image.htm]]
Ref : [[http://www.raspberrypi.org/forums/viewtopic.php?p=228099]]
apt-get install -y busybox-static e2fsck-static dosfstools
mkdir -p /data/slaves/tftp/initramfs/{bin,sbin,etc/udhcpc,proc,sys,rootfs,bootfs,aufs,rw,usr/bin,usr/sbin,lib/modules,root,dev}
cd /data/slaves/tftp
mknod /data/slaves/tftp/initramfs/dev/null c 1 3
mknod /data/slaves/tftp/initramfs/dev/tty c 5 0
touch /data/slaves/tftp/initramfs/etc/mdev.conf
cp /bin/busybox /data/slaves/tftp/initramfs/bin/busybox
chmod +x /data/slaves/tftp/initramfs/bin/busybox
ln -s busybox /data/slaves/tftp/initramfs/bin/sh
cp /usr/share/doc/busybox-static/examples/udhcp/simple.script /data/slaves/tftp/initramfs/etc/udhcpc/
chmod +x /data/slaves/tftp/initramfs/etc/udhcpc/simple.script

mknod -m 0444 /data/slaves/tftp/initramfs/dev/random c 1 8
mknod -m 0444 /data/slaves/tftp/initramfs/dev/urandom c 1 9
echo 'root:x:0:0:root:/root:/bin/bash' > /data/slaves/tftp/initramfs/etc/passwd
cp /lib/arm-linux-gnueabihf/libnss_files.so.2 /data/slaves/tftp/initramfs/lib/
PROG="/usr/bin/ssh";  for i in ${PROG} `ldd ${PROG} | cut -d/ -f2- | cut -d\  -f1`; do mkdir -p /data/slaves/tftp/initramfs/$i; rm -Rf /data/slaves/tftp/initramfs/$i; cp /$i /data/slaves/tftp/initramfs/$i; done
#PROG="/usr/bin/ssh-keygen";  for i in ${PROG} `ldd ${PROG} | cut -d/ -f2- | cut -d\  -f1`; do mkdir -p /data/slaves/tftp/initramfs/$i; rm -Rf /data/slaves/tftp/initramfs/$i; cp /$i /data/slaves/tftp/initramfs/$i; done
#chroot initramfs/ ./bin/sh -c 'ssh-keygen -N "" -f /root/.ssh/id_rsa'
#cat /data/slaves/tftp/initramfs/root/.ssh/id_rsa.pub >> /root/.ssh/authorized_keys
cp -r /root/.ssh /data/slaves/tftp/initramfs/root/
chmod 600 /data/slaves/tftp/initramfs/root/.ssh/id_rsa
cp /lib/modules/3.12-1-rpi/kernel/fs/aufs/aufs.ko /data/slaves/tftp/initramfs/lib/modules/
mknod -m 600 /data/slaves/tftp/initramfs/dev/watchdog c 10 130
cp /lib/modules/3.12-1-rpi/kernel/drivers/watchdog/bcm2708_wdog.ko /data/slaves/tftp/initramfs/lib/modules/
cat > /data/slaves/partitions.sfdisk << EOF
# partition table of /dev/mmcblk0
unit: sectors

/dev/mmcblk0p1 : start=       16, size=    97712, Id= b
/dev/mmcblk0p2 : start=    97728, size=  2000000, Id=83
/dev/mmcblk0p3 : start=  2097728, size=  2000000, Id=83
/dev/mmcblk0p4 : start=  4097728, size=  3529024, Id=83
EOF
PROG="/sbin/sfdisk";  for i in ${PROG} `ldd ${PROG} | cut -d/ -f2- | cut -d\  -f1`; do mkdir -p /data/slaves/tftp/initramfs/$i; rm -Rf /data/slaves/tftp/initramfs/$i; cp /$i /data/slaves/tftp/initramfs/$i; done
PROG="/sbin/mke2fs";  for i in ${PROG} `ldd ${PROG} | cut -d/ -f2- | cut -d\  -f1`; do mkdir -p /data/slaves/tftp/initramfs/$i; rm -Rf /data/slaves/tftp/initramfs/$i; cp /$i /data/slaves/tftp/initramfs/$i; done
cp /sbin/e2fsck.static /data/slaves/tftp/initramfs/sbin/e2fsck.static
PROG="/sbin/mkdosfs";  for i in ${PROG} `ldd ${PROG} | cut -d/ -f2- | cut -d\  -f1`; do mkdir -p /data/slaves/tftp/initramfs/$i; rm -Rf /data/slaves/tftp/initramfs/$i; cp /$i /data/slaves/tftp/initramfs/$i; done
PROG="/sbin/dosfsck";  for i in ${PROG} `ldd ${PROG} | cut -d/ -f2- | cut -d\  -f1`; do mkdir -p /data/slaves/tftp/initramfs/$i; rm -Rf /data/slaves/tftp/initramfs/$i; cp /$i /data/slaves/tftp/initramfs/$i; done
PROG="/usr/bin/rsync";  for i in ${PROG} `ldd ${PROG} | cut -d/ -f2- | cut -d\  -f1`; do mkdir -p /data/slaves/tftp/initramfs/$i; rm -Rf /data/slaves/tftp/initramfs/$i; cp /$i /data/slaves/tftp/initramfs/$i; done
touch /data/slaves/tftp/initramfs/init
wget -O /data/slaves/tftp/initramfs/init --no-check-certificate https://www.cerbelle.net/redmine/attachments/download/50/init
chmod +x /data/slaves/tftp/initramfs/init
Copy the attached init script in */root/work/initramfs/init", rebuild the initramfs file and package it for u-boot
cd /data/slaves/tftp/initramfs && find . | cpio -H newc -o | gzip > /data/slaves/tftp/initramfs.igz && cd -
/root/u-boot/tools/mkimage -A arm -O linux -T ramdisk -C gzip -n "U-Boot Initial RamDisk" -d /data/slaves/tftp/initramfs.igz /data/slaves/tftp/initramfs.igz.uimg
Clean the downloaded packages stored in apt cache.
apt-get clean
Now, the master is ready to serve. At the next boot, it will use its static cluster IP (192.168.2.1), will act as a DHCP, DNS and TFTP server to permit the automatic slave installation, updates and boot. So, you can halt the master :
halt
Connect it to the cluster network, with all the slaves and begin to prepare the slave's SD cards.
Create a partition table with only one vfat partition.
Mount the partition
Copy all the files from /data/slaves/bootfs/ in this partition
unmount the partition
Boot the slave with this SD card, it will :
- get an IP address (and the Master's IP) from DHCP
- get u-boot's configuration file (boot.scr.uimg) from master via tftp
- get the kernel from the master via tftp
- get the initramfs from master via tftp
- boot the kernel with initramfs
The initramfs will :
- get the Slave's partition table from master,
- if the partition table changed, it will apply it, format all the partitions, update the boot partition (firmware) from the master and reboot
If the partition table is OK, so it will :
- if the slave's root filesystem (system) changed (faster than a full filesystem comparison), it rsync it from the master via rsync (faster than a copy) to the slave
- it mounts the root filesystem
- if a working partition is requested, it remounts the root filesystem RO, create and format a RW partition (in memory if volatile or on disk), and overlay this RW partition on top of the system filesystem
- switch to this root partition and launch the standard init process
After playing with slackware, redhat and other Linux distributions since 1994, I discovered Debian in early 2000, and I dont see any reason to change now or in the near future. My workstations are using heavily customized Debian, my servers (at home and in datacenters), too. I will remain consistent.
Raspbian (http://www.raspbian.org) is the logical choice. I want to be able to use this mini-cluster as a lab to learn the most I can about parallel computing. It includes distributed parallel computations using MPI/LAM or PVM, using a Batch queue manager such as DrQueue or Torque, or using Mosix. I would like to test also some parallel storage in terms of filesystem, using HDFS, DRDB, GFS, ... or using distributed databases such as MongoDB, Hadoop, BigQuery, ... Finally, I want to test theory about Load-balancing and High-Availability using haproxy, heartbeat, pacemaker, stonith, LVS... Maybe, if I can, I might test OpenStack to create a personal cloud, but given the hardware specs, each node might only be able to execute one and only one vm image... The raspberry cluster won't be a good choice for this purpose. I would like to use distcc to try distributed compilation. Maybe Globus , too...
As the Raspberry Pi has no firmware embedded and as the whole boot process is made by the GPU from a loaded firmware, each node needs to have an SD card inserted with at least the GPU initialization code and a boot loader. I could use an NFS root filesystem, it would take no memory, would not be fully transfered at boot, but would be slower than a local filesystem and would uselessly overload the network and the CPU (the network interface is on the USB). I could load a kernel and an initial ramdisk with the whole OS. It would be convenient, all the slave will always boot on a fresh and up-to-date OS, but this initrd would be big, it would use a lot of the precious node's memory. Ok, since we have a local SD card in each node, it will be more efficient to have all the read/write operations made on this card instead of through the network or in memory, so I'll store the firmware, the swap and the root filesystem on the local SD.
Now, the issue is that the slaves will live their own life on their own local SD card. All the nodes have to be exact clones, at least at the file level. I have to find a way to minimize the changes made on the slave's OS. Cloning ensure similar nodes, but is heavy. Replicating the same changes on all slaves /should/ work, but divergences can happen, and if they can, they will happen. Here, the idea is to keep the cloned filesystem clean and to write changes somewhere else. I will mount the cloned filesystem read-only and use another partition mounted with unionfs on top of it, in read-write mode. When the changes made on the slaves using the configuration manager or made manually will diverge too much... I'll just have to revert all changes made on all slave since the OS cloning (clean the read-write partition).
Another issue, with 15 nodes, it is very long to clone a minimal Raspbian system (300MB) on each card. This operation occurs when initializing a new node, when a node got corrupted or when I want to change/upgrade the OS on all the slaves. I minimalized the risk of desynchronization, using unionfs, but it still can happen. I would need to reflash 300MB on 15 SD cards... No way ! I want this slave OS upgrade or restore to be automated throught the network, without any physical action. I can use the locally stored kernel and initrd to check on the master if there is a new boot and/or root partition image to flash on the SD card, download and install it, and finally boot on it.
This strategy seems OK. But can be long : 300MB for the image, compressed to 150MB, but sent to 15 nodes simultaneously at 500KB/s means... 1h15 to wait for a new OS to be deployed... :( For sure, I need the nodes to be exact clones, but clones at the filesystem level, not at the block level. So I don't need to deploy SD or partition images, I can only synchronize the filesystem. Thus, I can use rsync to only deploy the changes made to the slave's OS on the master node to the slaves... I can save more time, the longer part of rsync is to parse the local and the remote filesystems to detect changes. The initrd can just check the timestamp of a specific file to know if rsync has to be executed or not... The time needed to deploy a brand new whole OS will still be the same (but it occurs very seldom), and regarding changes or upgrades, ... it will be a lot faster (I estimate approximately 10 minutes).
There is still an issue : what happens if I break the slave's initrd stored on the master ? All the slave node will boot, their old initrd will detect an update, they will download and deploy it and... I'll have 15 bricked slaves ! I have to reflash manually each node's SD card. No way ! So, the idea is to get dynamically the kernel and the initrd (with the potentially broken upgrade logic) from the master, through the network, at boot time. It can be broken, I will only have to fix it on the master and to reboot the slaves (the only physical action). I still can break the slave's firmware or bootloader on the master, it can be deployed and will brick the slaves. In this case, I'll have to reflash all the SD cards, but it will be fast as the SD image will only have to contain the firmware and the bootloader, everything else will be automated through the network at the boot time. Unfortunately, the default firmware is only able to boot a kernel and an initrd from the local SD card. I have to install a network enabled bootloader, to write it on the SD card and to chain it after the default bootloader.
So, I have all the puzzle's pieces : The master hosts a slave's boot partition with the firmware, a network enabled bootloader, a kernel and a customized initrd. It also stores the slave's root filesystem. To create a new node or to restore a node after a bad firmware/bootloader configuration, I only need to write few KB to its SD card. When the slave boots, the bootloader loads the kernel and the customized initrd from the master, the initrd ensure that the locally stored partitions are synced with their template from the master very efficiently, the local partition should never desynchronize thanks to the changes externalized in another partition.
An SSH server is obviously needed to enable inter-node communication and control from the user. As well as an NTP client to get the time from internet (the Raspberry does not have a RTC to store the date and time, it loose it at shutdown) and an NTP server is also obviously needed to share the time between the master and all the slave nodes without overloading the outside NTP servers and the internet connection.
I need an option capable DHCP server, a DNS server, a TFTP server. Fortunately, DNSMASQ can deal with the DHCP, the DNS and the TFTP part with a quite light footprint and with consistency.
The master node needs to provide the boot and root partitions templates to clone on the node's local SD card. Rsync will do the trick, without a rsync server to save memory with one less daemon (either rsyncd or portmapper). The node's initial ramdisk with initiate the rsync server's execution on demand through SSH which is needed.
On each node's SD, I need the raspberry's GPU firmware and a network enabled bootloader : Currently, I only found u-boot in Stephen Warren's GitHub repository to deal with a reliable and flexible network boot. It can use DHCP, BootP or PXE to get an IP, can use TFTP to grab the kernel and the initial ramdisk, and everything can be scripted.
I will need to connect to a terminal on the master node and sometimes on the slave nodes, through the network. I don't want to enter again and again any credentials and I'll always need to connect as root. Furthermore, inter-node similar automated connections will also be needed to synchronize processes, for example.
When the nodes will try to install new packages, it will need to download several time the same package from the Raspbian repository or from the RaspberryPi repository, so it might be interesting to host repository mirrors on the master's hard drive.
The nodes will need to share data in files. So I need a shared scallable network filesystem. It has to be light, fast, reliable, synced with a small memory footprint... I am naïve and still believe that perfection does exist.
The master should be able to distribute post-initialization configuration changes. A configuration manager will be installed.
I will need an SSH server in all nodes, with root login by key, both for manual connections and for automated inter-nodes communications and synchronizations.
From my workstation, I will use PAC (http://sourceforge.net/projects/pacmanager/) as an SSH client to connect to all the nodes. It has wonderful cluster management features.
As a configuration manager, I will use puppet to configure the cluster, with its friends, augeas, facter, hiera, and mcollective. I am not sure about mcollective, as it might not be the best tool to manage a cluster of similar nodes, it seems to be oversized and duplicating the useful needed features already provided by PAC. Puppet will help to manage configuration consistency. MCollective will help to execute tasks simultaneously on a defined set of nodes (its advantage against PAC is the ability to script it from command line, whereas PAC is interactive). So the master node will need a PuppetMaster installation with Apache and Passenger to deal with multi-threads and with concurrent (all nodes) connections.
Regarding the Raspbian and RaspberryPi repository mirrors : Apt-Mirror is my favourite tool for this task when rsync is not available. mini-httpd or tiny-httpd would be sufficient to serve these mirrors inside the cluster. These HTTP servers are very light, fast and perfect for this task, but as Apache needs to be installed to serve Puppet's clients, I'll use Apache for the mirrors, too.
I still hesitate between NFSv4 or GlusterFS. The first one is light, can be enhanced with a cache, but might be weak with simultaneous write from the whole network to the same files with the locks. The second one is stronger, but less light.
In an ideal world, I would need to be able to reset all the nodes and to choose to deploy a new disk image (Raspbian) on all nodes through the network. I might have a look at the Raspberry Fundation recovery partition to try to change it to achieve this goal : if shift is pressed or if there is a newer disk image available on the master server, then, the recovery partition will restore the master image on the node and execute a customization script (to update the hostname, the IP, ...). But it is not the main goal of this cluster. I'll try to do this later.
All the nodes have to share some standard basis :Of course, all these possibilities have to be Pupettized ! I want to be able to reformat and rebuild automatically each node. to reaffect it to another task for example.
First of all, I needed a standard SD card image. I installed a defaut Raspbian on a SD card without any customization and I created an image of it using partclone. the standard Raspbian installation creates 2 partitions : the first one, with a FAT filesystem, containing the Raspberry Pi GPU firmware and the kernel to boot, and the second one which is the root filesystem. So, I have one image for each partition, one file for the SD card MBR, created with dd and one file for the partition table, created with sfdisk. Yes, I know that the partition table is part of the MBR, anyway.
I am now able to clone the default node on each other, but they will all have the same IP and the same hostname. Regarding the IP addresses, I used my network's DHCP server to give a fixed IP address, using the Raspberry Pi MAC address. So, each node has its own IP address and it is fixed, this way I know where is located each node in my box. Regarding the hostname, I created a scripts to clone the SD cards. This script mounts the cloned filesystem to change the hostname in several files (/etc/hostname, /etc/mailname, /etc/hosts, /etc/ssh/ssh_host_*_key.pub, /etc/exim4/update...). Then, when a node boots, it has its own hostname associated with the SD card and its own IP address associated with its MAC address. It is not yet perfect, but enough for my first try.
The cloning script also add an initialization script in /root : install-puppet.sh This one is intended to be executed manually after the first boot. Its goal is to update the system, install puppet, set the puppetmaster server and execute puppet to actually configure the node.
When you update one computer, using a remote internet repository, your network has to download once every file. When you have several computers to update, the amount of download bits is several times the initial amount, the download time also, but they seldom update simultaneously. When you have 15 cluster nodes, they ALL updates simultaneously !!! They kill my network, they use all my internal and external bandwidth, they take more than one hour for their initial update. Well, I do need repository mirrors. I tried to rsync them. Even if Raspbian.org is rsyncable, unfortunately, raspberrypi.org is not... So, I tried to have some consistent mechanisms and chose apt-mirror to mirror the armel and armhf architectures, for wheezy and jessy versions of debian/raspbian. Then, I published the mirrors using the lightweight mini-httpd, which is already an overkill for this simple task !
10 Cluster 10mo 10.7 Network FS : HDFS
54 Cluster L 8mo 4.21 Partition de recovery
55 Cluster L 8mo 4.21 Recovery automatique si GPIO1 pressé au boot
56 Cluster L 8mo 4.21 triggerhappy : GPIO1 = reboot / shutdown ( appui long)
15 Cluster 10mo 2.65 Remove uDev Persistent network rule
48 Cluster 9mo 2.5 Logstash
49 Cluster 9mo 2.5 Graylog2
14 Cluster 10mo 2.68 Puppetize collectd/carbon/graphite
13 Cluster 10mo 3.69 Install/Configure MCollective
2013-08-14 http://www.unixgarden.com/index.php/gnu-linux-magazine/mcollective-l-administration-systeme-massive
2013-08-14 http://docs.puppetlabs.com/mcollective/
2013-08-14 http://wiki.deimos.fr/Puppet_:_Solution_de_gestion_de_fichier_de_configuration
2013-08-14 http://fr.slideshare.net/PuppetLabs/presentation-16281121
2013-08-28 http://www.puppetcookbook.com/
5 Cluster 10mo 2.69 Processing : Torque
6 Cluster 10mo 2.69 Processing : DRQueue
7 Cluster 10mo 2.69 Processing : MPI-LAM
8 Cluster 10mo 2.69 Processing : PVM
9 Cluster 10mo 2.69 Processing : Globus
53 Cluster 8mo 2.46 Processing : JobScheduler
20 Cluster 9mo 2.62 Network FS : Gluster
21 Cluster 9mo 2.62 Network FS : GFS2/NBD GFS2/DRBD
22 Cluster 9mo 2.62 Network FS : Lustre
23 Cluster 9mo 2.62 Network FS : AFS
24 Cluster 9mo 2.62 Network FS : Coda
25 Cluster 9mo 2.62 Network FS : Intermezzo
26 Cluster 9mo 2.62 Network FS : GFarm
27 Cluster 9mo 2.62 Network FS : Ceph
28 Cluster 9mo 2.62 Network FS : PVFS
29 Cluster 9mo 2.62 Network FS : Parallel NFS
30 Cluster 9mo 2.62 Network FS : CXFS
31 Cluster 9mo 2.62 Network FS : pNFS
32 Cluster 9mo 2.62 Network FS : NFS4.1
33 Cluster 9mo 2.62 Network FS : MooseFS
34 Cluster 9mo 2.62 Network FS : GPFS GeneralParallelFS
35 Cluster 9mo 2.62 Network FS : DRBD
36 Cluster 9mo 2.61 DB: Cassandra
37 Cluster 9mo 2.61 DB: Riak
38 Cluster 9mo 2.61 DB: VoltDB
39 Cluster 9mo 2.61 DB: Redis
40 Cluster 9mo 2.61 DB: SolR
41 Cluster 9mo 2.61 DB: Lucene
42 Cluster 9mo 2.61 DB: ElasticSearch
11 Cluster 10mo -2.31 DB: Hadoop/Hive
12 Cluster 10mo -2.31 DB: Hadoop/HBase
43 Cluster 9mo 2.6 Cloud: OwnCloud
44 Cluster 9mo 2.6 Cloud: OpenStack
45 Cluster 9mo 2.6 Cloud: LVC
46 Cluster 9mo 2.6 Cloud: KVM
47 Cluster 9mo 2.6 Cloud: QEMU
http://elinux.org/RPi_Hub
http://radiospares-fr.rs-online.com/web/
http://www.rs-particuliers.com/
http://www.ldlc.com/
http://coen.boisestate.edu/ece/raspberry-pi/
http://blog.afkham.org/2013/01/raspberry-pi-control-center.html
http://blog.afkham.org/2013/02/building-raspberry-pi-cluster-part-2.html
Unattended Raspbian install : http://www.raspberrypi.org/forums/viewtopic.php?f=66&t=50310
Read only rootfs : http://www.raspberrypi.org/forums/viewtopic.php?p=228099